
You can send the data collected by WhatsForm straight to your server or another compatible web app through Webhooks. When user clicks on the Submit button on WhatsForm, that’s when the webhook is triggered.
Note
The steps described here might be a bit technical for non-developers. We recommend consulting a developer from your team to proceed with this integration.
What is a Webhook?
In general terms, a Webhook is simply a notification sent over the web, which is triggered automatically whenever a specific event occurs.
Here, the event is the clicking of the Submit button in the form. Whenever a new response comes in, a notification containing the form response data is immediately sent to your chosen destination via the Webhook URL which you have configured.
Our Webhook notifications are sent via HTTP POST request or HTTP GET request.
Setting Up
Setting up the webhook integration is very easy. You can write a simple API that collects data via GET or POST parameter and updates it to your database or CRM.
In your WhatsForm dashboard, under Settings > Integrations you will find the Webhook option. Click on Connect.

This brings up the Webhook settings. It has many fields. Let’s go over them one by one.
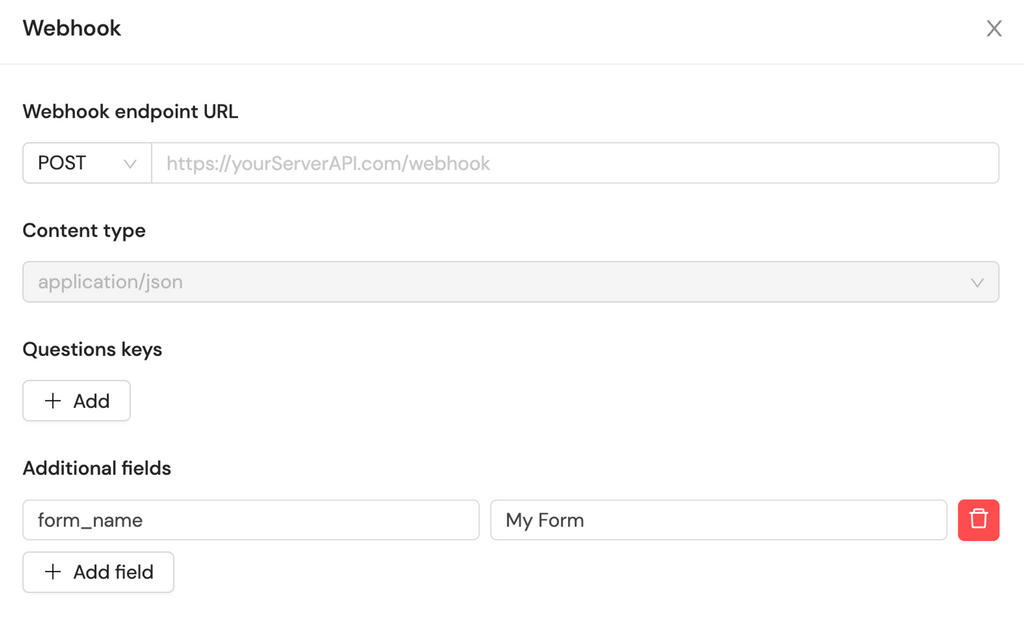
Webhook Fields
1. Webhook endpoint URL

Here, you need to specify the public Server API URL. This is where you will be pushing the form response data to. Choose an API method according to how you wrote the API. We currently support GET and POST requests.
2. Content Type

Here, you can choose a content encoding 'application/x-www-form-urlencoded' or 'application/json' which we want to send data. The default value is 'application/json' and this works in most of the cases.
3. Question Keys

You can add questions from the form which needs to be sent. Each question needs to be assigned a unique key. This key will be used to identify the question and answer paid while it is received on your server end. We also provide three custom keys, they are:
Response number: A number that indicates the response count
Response time: The date and time when the response was submitted
Delivered to: To which WhatsApp number the response was submitted to
4. Additional Fields

If you have key-value pairs that are mandatory in an API request, you can provide them here.
5. Headers

You can add headers in your Webhook to perform various actions such as authorization.
Steps to Proceed
Fill in the required information that is required by your Webhook URL. Double check your keys to make sure there are no errors.
Click on Save to save the changes.
Now click on Test Webhook. You will get a success/error message depending on the status.

Check if the request hits your server. Alternatively, you can use some proxy interceptors like Webhook.site, Intercept.rest, to test if WhatsForm is sending the data.
If everything went well, congrats! Your webhook is active on your WhatsForm and will be triggered every time the form receives a response.
Still need help?
Contact us